
When I have discussed Windows Home Server (WHS) with people, I am often asked if it will work with Time Machine on their Macbook or similar. Since Apple killed SMB support in Time Machine, it’s not quite as easy as it used to be. HP Media Smart Server has an add-in that supports Time Machine, but how do all of us who sit on a WHS of another brand, or even a home-built one? Well, it can be solved for us too, you just have to work a little harder. Taught me the following steps from Brent on Compugeek Software.
Make your WHS ready for Time Machine
- Create a new shared folder for Time Machine on your WHS.
- If you feel that you do not want to connect to your WHS via Remote Desktop Connection (RDC), you may also install the Advanced Admin Console Add-In (AAC) on your WHS.
Get your Mac ready for Time Machine for WHS
Start a Terminal and run
defaults write com.apple.systempreferences TMShowUnsupportedNetworkVolumes 1
Configure Time Machine
After you have activated the possibility of using shared folders as Time Machine backup destinations, you must mount the folder that you previously created for the purpose in WHS.
- Open the Finder and locate your WHS
- Double-click on your WHS and if you receive a request for a username and password, fill in the information for a user on your WHS who has access to the shared folder you previously created. If you are not prompted for a username and password, click on “Connect as”. You must choose to save the data in the keychain, otherwise Time Machine will have problems when it will make its backups.
- Navigate to the folder you created for Time Machine and open it. You can now access it in Time Machine Preferences.
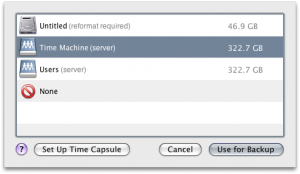
- Open Time Machine Preferences and select your share. It will be mounted as a disk and automatically re-mounted when Time Machine needs to make a backup. When you are asked for a username and password, you use the same as before.
- Disable backups
The first backup
Since Leopard 10.5.2, Apple has changed how Time Machine to a shared folder works. As a result, Time Machine will fail to create the first backup. To get around this, do the following.
- Connect to your WHS via RDC or start up the WHS Console and go to the AAC that you then installed earlier.
- Go to D: \ shares \ TIME_MACHINE_SHARE_NAME – TIME_MACHINE_SHARE_NAME should be the name of the folder you created for the backups.
- On your Mac, you activate backups and initiate a backup.
- If you are fast as you will see a new file in your WHS share. It will be hidden so you must have enabled you to see hidden files.
- Quickly copy the file to D: \ shares.
Create a working sparse bundle file
Since Time Machine fails to create the file automatically, we have to do it manually.
- Launch Applications / Utilities / Disk Utility on your Mac
- Click File-> New-> Blank Disk Image
- Navigate to your desktop in “where to save”
- As a name, use the name of the file you copied to D:\shares, but remove .tmp.sparsebundle from the name.
- As volume name, select Time Machine
- As the image format, you choose the sparse bundle disk image
- Partitions must be No partition map
- Volume format must be Mac OS Extended (Journaled)
- Volume size, select custom and then select as many GB as you want
- Time Machine max to use on your WHS
- Click create
- Eject the new disk images from Finder
- Now move the newly created file to your Time Machine Share on your WHS
- Activate backup again from Time Machine Preferences and start a backup. It will now complete the preparatory stage and make its initial backup.
- Delete the file you copied to D:\shares
Closing thoughts
So, now your Mac should be able to use your WHS as the destination for its Time Machine Backup. Turn on folder duplication if you want a little extra slip on your Time Machine backup. I am waiting with excitement for Microsoft to realize how many people are sitting on both Windows and OSX computers today and implement support directly in WHS so that in the same way as for a Windows machine you can choose folders of what to back up, etc. from WHS Console.
Comments
Powered by WP LinkPress